
As an Amazon Associate Playslideguitar.com earns from qualifying purchases. This page contains affiliate links.
Many listeners are drawn to the sound of slide guitar, and the slide’s distinct articulations of notes are great for musical expression and creativity. However, because of the techniques involved with it, it can seem challenging to learn how to play slide guitar and the basics involved with it.
But is playing slide guitar really that hard?
It can be easy to overlook the benefits of using a slide on guitar, especially if you’re not sure of certain elements involved with this playing style. But fret not, slide guitar can be much easier and enjoyable than it seems if you develop your playing by focusing on some basic foundational techniques.
Let’s take a look at how to play slide guitar in this tutorial, and dive deeper into its remarkable sound…
- How To Hold The Slide
- Using Your Right Hand: Muting Strings
- The Technique of Sliding: Articulation and Phrasing
- Against The Strings: Pressure of the Slide
How To Hold The Slide
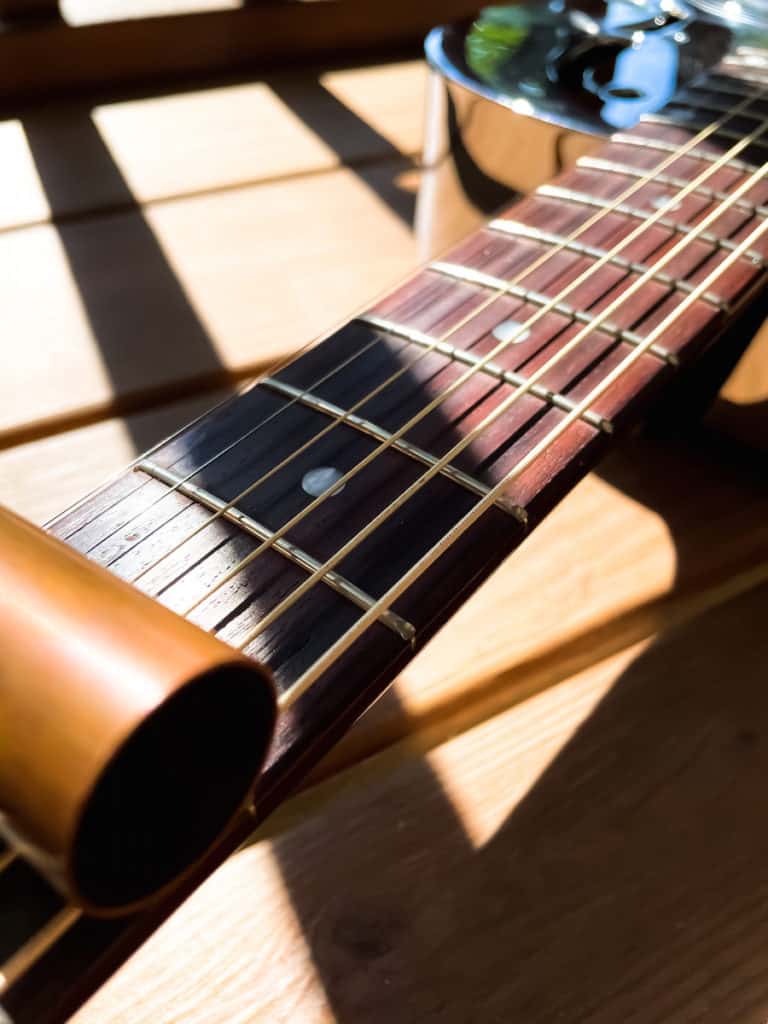
When using a slide, holding it with the finger is often a matter of finding out what works best and feels comfortable. Most players will use the slide on their ring or pinky fingers, and the middle finger is also an option.
Open ended slides can feel slightly different than using a bottleneck slide with a closed end, which allows a player the option to rest the end of their finger on the closed end. Usually, no matter what type of slide you use, being able to apply a small amount of downward pressure by pressing down with your finger within the slide is beneficial for creating sustain.
Keep in mind that whatever finger you decide to use the slide on, you’ll want to be able to dampen the strings behind the slide (on the side of the slide that extends to the keyhead area of the guitar). Also, try to choose a finger that feels the most natural to you, where you have more confidence in controlling the slide as you use it on the fretboard.
Arching or Bending Your Slide Finger
When your finger is in the slide, it can be beneficial and more comfortable to keep it relaxed and slightly bent within it. This will enable you to press down towards the strings with more control, and will also provide more fluidity for your movement along the neck as you play.
Keeping your finger completely straight within the slide will encourage it to tense up, thus making playing more rigid and uncomfortable. Like writing with a pencil, or holding an eating utensil, the hand is designed to be more adaptable for finer motions when the fingers are slightly bent.

A good way to find a comfortable arch amount for your finger is to put the slide on it while your palm is facing up, then let your hand and fingers naturally curl up as you relax them with an open palm. This will also put you in a similar position and angle for how you play your guitar with the slide, and can be a good starting point as you develop your technique.
Using Your Ring Finger
If you decide to use your ring finger, which is often a good finger to use if it feels comfortable for you, then you’ll have the option to fret notes with your index and middle fingers (and even your pinky) if you’d like to fret any notes the traditional way on your guitar.
This can provide some versatility in your playing, especially for playing chords, and is usually an option if your guitar’s action isn’t too high.
For a lot of people, their ring finger is usually more coordinated than their pinky finger, and the length of the finger can suit the size of the slide well too. However, since the motion of sliding also involves the hand, wrist, and arm, there isn’t a set in stone rule for using any particular finger for slide playing.

The Pinky Finger
For dampening the strings behind the slide, having the slide on the pinky finger can feel more natural for some players. Oftentimes, having the slide on the pinky will require you to use more arm and wrist motion as you slide along the fretboard, although this isn’t always the case.
One advantage of using the pinky finger is that you’ll have all three other fingers (besides the thumb) to use for fretting notes if you’d like. This can provide a lot of fretting options along with your playing if your guitar’s action isn’t too high.
If you do use your pinky finger for the slide, your pinky may need to be straighter (along with your other fingers) to create an even balance against the fretboard. The pinky may be less coordinated than other fingers, but if you hold the three other fingers together and rest them against the pinky/slide as you play, you’ll likely find that you have more control over using it.
The Middle Finger
Using the middle finger to hold the slide is another possibility, and the finger is actually quite dexterous naturally. However, it may be too large to fit comfortably within some slides, and you may find it tougher to dampen and mute the strings behind it having only the index finger to use.
Also, making sure the ring and pinky fingers don’t touch the strings that you’re playing may feel uncomfortable and create extra tension within your hand and fingers.

If you decide to play with your middle finger, try to find a slide diameter that matches the size of your finger, and don’t compromise your technique by using a slide that doesn’t fit properly.
Getting Comfortable With Holding A Guitar Slide
All slide playing may feel uncomfortable and unnatural when you initially start playing. However, whichever finger you decide to use the slide on, holding the slide will become more comfortable through time and experience.
Although slide playing can have a reputation for being a challenging technique to learn, it can actually be the opposite: many players picked up slide playing in the early 1900s because the technique felt easier and more natural than fretting notes on the guitar. It also didn’t give you callouses as you played.
Experimenting with using different fingers is usually the best way to determine which finger you’d like to use most often. You may find that you enjoy using one particular finger for certain songs or applications, and then switching to another for other types of playing. All in all, starting with the ring finger is a good choice, and many great players have had a lot of success with using this finger for their technique.
The Length of the Slide and Finger
Oftentimes, your finger is going to be longer than the slide that you use. Rarely, is the slide that you use for playing longer than your actual finger.
Because of this, you’ll find that putting an open ended slide on your finger, and letting it fall all the way down until it meets your hand, will make the end of your finger stick out of it. This can be detrimental to your technique, as it may make it harder to control the slide and put pressure against the strings for sustaining notes.

Find a balance for how much of your finger you place within the slide. Depending on your finger size, you’ll often have a half inch or more of the bottom of your finger that is not within the slide.
If you use a bottleneck slide, such as Dunlop’s 275 (click to see on Amazon), then the slide will naturally rest on your fingertip if you put it all the way on your finger. Sometimes it can be nice to leave a quarter inch or more between the top of the closed end of a bottleneck slide, and the end of your finger.
Using Your Right Hand: Muting Strings
A distinct aspect of playing slide guitar, muting or dampening the strings that aren’t being picked is usually an essential part of your right hand technique. If a string that is not being played isn’t muted by the right hand, then unwanted tones will sound as the slide moves along the fretboard.
Often with slide guitar, you will pick notes with your bare fingers which will provide a warmer sound than using a pick.
Using a guitar pick for slide guitar is possible, however it makes the technique of blocking (another word for muting or dampening the strings) more challenging. Finger picks can also be used, however the same principles for dampening strings will apply.
Muting the strings with the right hand is often a new technique to learn for guitar players that have never played slide before. However, it is simpler than it seems and can be learned efficiently in less time than you may think. Let’s take a look…
Resting The Palm
A great way to mute some strings that aren’t being played is to use the palm of your right hand. By resting the edge of your palm along the strings, you’ll also be able to develop a comfortable picking technique as you play.
To find a comfortable starting position, make a karate chop shape with your right hand, then rest the bottom edge of it along the strings near the bridge. Try to rest it parallel to the bridge, then let it curl over gently towards the strings as your fingers naturally bend and release tension.
You’ll likely find that your index, middle, and ring finger are now in a comfortable position to pick strings, and it can be beneficial to have them lightly resting on or between strings that you’d like to pick. Once your hand is in this position, most of the strings will be muted and you’ll be able to use individual fingers (or a combination of fingers) to pick the strings.
Keeping Close To The Strings
It can be tempting after you pick strings, to lift your whole hand and palm off of the strings as they are ringing. You will need to enable the strings that are picked to ring by not resting anything on them, however resting other parts of your palm, hand, and fingers on strings that aren’t being sounded is crucial for blocking.
This will be much easier if your hand and palm always stay close to the strings as you play, and it will actually be physically resting on them usually. The strings that are lower in pitch, than the ones that are picked, are usually muted with the palm or finger that is resting there already.
Strings that are higher in pitch, but aren’t supposed to be sounding, can often be muted by the other fingers on your right hand (the ones closest to the ground) that aren’t picking the notes. If you are playing the highest pitched first string, then you only need to mute the lower strings, and using the palm for the majority of these is often comfortable.
Coming From A Fingerstyle Tradition
Any guitarist that has used their right hand fingers for playing guitar before may find blocking strings for slide guitar to be much simpler, and straightforward.
Classical guitar often utilizes fingerstyle techniques, and getting comfortable with resting certain fingers on the strings with your right hand will make it easier to use them whenever you’d like.
If you’re used to using a guitar pick, the technique is still straightforward and simple to learn, it just takes a little time and practice.
Practicing The Technique
Try to learn how to make a single note sound cleanly on any string that you pick. As you slide between notes, listen closely for any other strings that ring out unwantedly.
Remember, only the string you are picking should usually be making a sound. If you hear other strings ringing out, or making a dissonant noise, then you’ll probably need to adjust your right hand or fingers in whatever way will dampen and mute those strings or sounds.
Learn to do this with single notes on any string, and also begin incorporating more than one string at a time. It can be nice for slide guitar, and a part of the style of playing, to play multiple strings or notes at the same time and slide between positions on the fretboard.
Using A Pick
Although it’s less traditional, and usually not encouraged for slide guitar, using a guitar pick is always a possibility for voicing notes. If you decide to use a pick, then you’ll likely find that the palm of the right hand is needed most of the time for blocking any notes that aren’t being played.
For strings that are higher pitched than the ones being played, it will be more challenging to block these when using a pick. It is possible to use the pinky finger or ring finger to do this, and you may have to experiment to find techniques that are comfortable and work.
If you decide to play with fingerpicks, which can produce a full and projecting sound, National’s NP2 Nickel-Silver Fingerpicks (click to view on Amazon) are great to use. Oftentimes you can produce a lot of sustain with fingerpicks, and the tone will be slightly brighter than using your bare fingers.
Getting Comfortable With Right Hand Muting
As with anything, the more you practice the technique: the easier it will become. However, usually it’s best to do whatever feels natural for the right hand.
If you keep things feeling natural and comfortable, while staying aware and listening for any strings that aren’t supposed to be creating noise, then you’ll go a long way with your right hand technique. You can make subtle adjustments as needed, and may find that the technique actually feels more natural than using a pick.
One advantage to using the fingers of your right hand for picking on slide guitar (or any type of guitar playing) is that it produces a nice and warm tone. You may also gain more control over notes, as you have more of a feel and connection to them through your fingers.
Although you may not be able to play notes as fast with your fingers than a pick, phrasing and articulation are the keys to expression on slide guitar, and will always catch a listener’s attention more than the speed of notes.
Watching videos of slide players like Derek Trucks, Warren Haynes, and many others, is a great way to study right hand technique for slide guitar. Keep an eye on how they pick the notes, and what they do with the rest of their hand and fingers after the notes are voiced.
The Technique of Sliding: Articulation and Phrasing
Although other techniques come into play for slide guitar, how you actually slide into notes is perhaps the most pivotal aspect of the expression and phrasing of notes. So much life can be added to what was once a normal note, and the way you slide will be a large part of your voice.
The speed and rate that you slide into a note, as well as the distance of movement, will affect the articulation of the notes you play greatly. Although much of slide playing comes down to feel, the more facility and options you gain for sliding into notes will open up your sonic palette.
The beauty of slide guitar, and much of music in general, is that there aren’t many notes in the grand scheme of things: it’s how you voice them that usually makes an impact on a listener’s soul. Slide guitar is a perfect example of this, and the distinct timbres it provides gives so much depth to music…

The Speed of the Slide: Moving Into A Note
How fast or slow you slide into a note will greatly affect the sound you create. Slides are often light enough to provide a great amount of fluidity and movement on the neck, which will give you plenty of options for how quickly you move into a note.
Faster movements can provide a characteristic and energized sound to the note that is slid into, and using this type of movement for blues and rock music is a great way to create a genuine slide sound. However, it will always depend on the musical situation, and the rhythm and style of a tune will always be a factor in how you choose to voice a note.
Slower slide movements may make microtones more noticeable to a listener, and hearing these “in-between” frequencies of two notes is a neat way to accentuate notes with the slide.
In the initial stages of playing slide, you may not realize just how much speed and control that you can have with your slide. A quick listen to Derek Trucks will show that sliding into a note at a rapid rate, while landing on it with precision and control, can create some of the most expressive sounds in music.
Experimenting with how fast you slide into a note is a magnificent way to link your ears with your slide voice, and you’ll find that the broad range of slide speeds is a spectrum that has infinite sonic possibilities for a slide player.
The Distance Of The Slide
Playing a huge part in the phrasing, articulation, and tonal aspects of the note, how far you slide when moving into a note is an important thing to pay attention to when developing your slide voice.
Moving into a note from one fret below often produces a brighter perception that can be characteristic of jazz, swing, and pop styles. However, this will depend on the melodic and harmonic aspects of the note choice, and there are many factors that also influence this sound.

For blues, rock, and other forms of music, sometimes sliding into a note from two frets below will create a warmer and richer sound that is perceived as more down to earth for that particular style. Keep in mind however, that any note can be slid into from any distance and sound different: the speed at which you move into the note greatly affects the distance’s sound. These two factors play off of each other.
For instance, sliding into a note from seven frets below at a slow speed can have a radically different sound than sliding the same distance very quickly. Both can be great forms of slide articulation depending on the musical application.
Ways To Practice
For varying the speed and distance of your slides, and determining just how these sound in musical contexts, it can be beneficial to practice the phrasing and articulation of one note at a time.
Really focusing on creating different expressions in your practice session, with only one note, can show you the range of expression that is possible with the slide.
Try taking a single note on the fretboard, like the E note on the first string at the 12th fret, and explore how many ways you can voice that note with the slide. At first, experiment with sliding into this note from one fret below it, then try sliding into it from two frets below.

As you incorporate varying distances of movement into the note, begin varying the speed of these slides as well. It can be helpful to use a metronome like the Tama RW200 for the rhythmic aspects and feel of the note’s phrasing.
Think about, and listen for, how different it sounds when sliding into a note at a very fast speed, compared to a very slow one. Every time you slide, try to think about landing on the note accurately, which will deepen your intonation.
Landing At The Note: Precision and Control
Every time you finish sliding into a note, which will often be directly over the fret, try to do so with precision and control. Any extra movement to find the note, and get it in tune, will usually take away clarity from the note and be audible to a listener.
Compared to the regular way of fretting notes on guitar using the fingers, on slide guitar the note will usually be voiced directly over a fret in order to be in tune.
If you are sliding into a note at the 12th fret, be fluid with your movement into the note. However, once you arrive at the note over the fret, you’ll usually need to land there with control and balance. This will give you the ability to create vibrato, and voice the note with a full and precise sound.

Because slide guitar has a “fretless” technique of playing, the ability to precisely land at a note and be in tune can be more challenging than fretting notes (placing a finger on the fretboard in between notes like you do when playing regular guitar). This may take some getting used to, however the frets are great visual tools for landing directly on a note and being in tune.
Although the technique of sliding can be hard to describe in words, being aware of certain things as you listen and play slide guitar will help you focus on certain aspects of your technique and help you develop your sound.
The more you play, the more your slides will begin to feel like second nature to you. However, thinking about how many frets you’re sliding at a time, as well as how fast you’re moving into a note, will be a great way to understand how the slide will articulate and phrase the note. These are great things to keep in mind when voicing notes with your slide on guitar.
Against The Strings: Pressure of the Slide
A technique that is important to playing slide, the amount of pressure you create against the strings with the slide is essential in sustaining and creating notes. You can produce a solid sound by putting enough pressure against the strings, while making sure you aren’t pressing down too firmly towards the fretboard.
The slide’s fluidity along the strings is always beneficial to your freedom of expression as you play, and finding a balance between pressing down on the strings to create a full tone, while still being able to move gracefully will go a long way.

Another aspect of this technique to keep in mind, there is always the potential for your slide and/or the strings to bottom out against the fretboard. This is especially true if your guitar’s action is low, whether by choice, or because your guitar isn’t setup ideally for slide playing.
Let’s take a look at using the slide against the strings, so we don’t feel too much pressure as we play…
Creating Enough Sustain
The amount of pressure you put against the strings should create enough sustain for the note to last a duration of time that you intend it to. The note will always naturally decay in volume, and its life will depend on how hard you pick it. However, the goal is to create enough sustain with the slide that you have the ability to add musical details to it with vibrato and pressure as the note rings out.
If you put too little pressure against the strings, oftentimes the string will buzz against the slide and a dissonant sound is heard. When this happens, try applying more pressure against the strings so that the note’s attack is clear and present as soon as you pick it, and the note has the ability to ring out.
Oftentimes, using a heavier slide like Dunlop’s 278 (link to Amazon) can help provide a little more pressure and sustain for notes if you’re using glass slides. Using a heavier slide can also be helpful if you’re using another type of slide material.
If you don’t add any vibrato to a note, it will sound similar to a note played cleanly on guitar with a fretted finger, except you are using a slide. When you put an amount of pressure against the strings that produces a clean note from a technique standpoint, with sustain, you’ll be able to slide to another note and the note can continue to voice itself.
This sustain will often sound uninterrupted and continuous from a dynamic standpoint, which can be a good indicator for your technique. Sliding between notes, and creating them, is much more efficient and fluid with a balanced amount of pressure against the strings.
Bottoming Out
When you do find yourself bottoming out against the fretboard, with either the strings or the slide, first make sure this isn’t happening because your slide isn’t even or parallel with the strings. Sometimes, if you push down unevenly against the strings, the slide’s edges may hit the fretboard.
If you’re bottoming out and your slide has stayed relatively even against the strings, try taking some pressure away with the slide, but not too much where you lose sustain and the ability to create a good tone.

It is common for guitars with lower action, or that are setup for standard guitar playing, to bottom out easily when you are developing your slide technique. This is because there is often little room for error regarding the amount of pressure you can apply on the strings, while still keeping an even contact area against the strings. It can be very beneficial, especially as you develop your technique, to have a guitar that has an action that is setup for slide guitar.
How To Put The Pressure On
A lot of the pressure that you’ll produce can be created with the finger that the slide is on. You’ll want the slide to fit on your finger and be comfortable as you play, and pushing down with the finger (inside of the slide against the strings) will help keep the slide from moving on your finger.
This will also provide a nice control of the slide, and you’ll find that it becomes more of a fixture on your finger that is comfortable to maneuver with.
Since they’re so connected, you may find that some of the pressure you apply against the strings also comes from your hand, wrist, and arm. Try to find a natural combination of these elements, that is relaxed and efficient. Although it may feel uncomfortable and awkward at first, the slide’s pressure against the strings becomes easier with time.
Practicing Slide Pressure
A great way to practice this technique, and find a good equilibrium against the strings, is to focus on one note at a time. Playing with a drone track, or repeating tone, can be a good way to do this.
As you play your note with the track, focus on your tone and become deeply aware of how the note sounds. Do this whether you are playing one note in a set position, or sliding into and out of notes. Try to focus on playing the note cleanly, and applying a comfortable and efficient amount of pressure.
If you push down too hard against the strings, you may notice that the pitch of the note will raise too much and affect your intonation. Use your ears and slide finger to compensate, and this will help you find a good equilibrium with your slide pressure.
Using Vibrato
Closely related to slide pressure, using vibrato is one of the most expressive aspects of playing slide guitar. Vibrato is a great way to evoke more feeling and nuances out of the notes that you sustain with the slide.
By moving the slide back and forth while sustaining a note, vibrato alters the pitch of the note in a way that is characteristic of a singer’s voice. It is also an effective way to accentuate the tail-end of notes that you play, and each player has a distinct style of vibrato that develops through listening and experience.
To learn more about vibrato for slide guitar, here’s an article that goes into more detail about the playing techniques involved with it.
Clean Notes and Options
A great goal for slide playing technique is to be able to play any note on the fretboard cleanly and in tune, without having to think about it. This is true whether you are sliding into a note, or just playing the note without any kind of movement.
Much like a guitar player does when they fret a note with their finger, without bending or altering the note in any way, having the option to play notes without sliding into them is beneficial for your phrasing possibilities.
Finding and creating equilibrium with the slide pressure you produce will add a lot to your tone, and you’ll begin to have a crisp definition on the notes you voice. This will reflect itself in many aspects of your slide playing, and your tone will deepen along with your palette of sounds.
You’ll begin to notice that your playing sounds more full, even if you are playing an electric guitar without amplification. A good equilibrium of pressure will project itself through the instrument, and the slide’s voice will catch the listener’s ears just from its tone and sound.
Conclusion
No matter how you approach playing slide guitar, you’ll quickly notice how many musical possibilities there are when using a slide. It is a remarkable form of musical expression, and it is exciting to see how slide guitar evolves in music.
Whether you’re looking to add more tonal options to your playing, or if you’re drawn to its sound in the music you enjoy listening to, slide guitar is a great way to create more with your music. It is one of the most unique expressions on guitar, and its no wonder why players continue to utilize its tradition in their playing.
For more playing tips and advice, check out the page below…
Slide Guitar: 5 BEST Ways to Improve Your Playing (Practice Tips)